What Happens When You Visit a Website? A Step-by-Step Guide for Beginners
Have you ever wondered what actually happens when you type a website address into your browser and press Enter?
It feels almost instant. Within a few seconds—or even milliseconds—a fully functional webpage appears on your screen, complete with text, images, styles, and interactive features.
Behind this seemingly simple action lies a fascinating sequence of events involving your browser, the internet, DNS servers, web servers, HTTP requests, and rendering engines.
Understanding this process is valuable for every developer because it provides a solid foundation for learning web development, debugging applications, and improving website performance.
In this guide, we'll explore exactly what happens when you visit a website, step by step.
Step 1: You Enter a URL
The journey begins when you type a URL into your browser.
Example:
https://example.com
A URL consists of several parts:
- Protocol: https
- Domain name: example.com
- Optional path: /products
- Optional query parameters
Your browser first needs to understand where this website is located.
Step 2: Browser Checks the Cache
Before making any network requests, the browser checks whether it already has the required resources stored locally.
The browser may already have cached:
- HTML
- CSS
- JavaScript
- Images
- Fonts
If valid cached files exist, loading becomes much faster.
Caching reduces:
- Network traffic
- Server load
- Page loading time
Step 3: DNS Lookup Begins
Humans remember domain names.
Computers use IP addresses.
For example:
example.com
must eventually become something like:
93.184.216.34
This translation happens through the Domain Name System (DNS).
DNS works like the internet's phone book.
The browser asks:
"What is the IP address for this domain?"
DNS servers provide the answer.
Step 4: Establishing a Connection
Once the browser knows the server's IP address, it establishes a connection.
If HTTPS is being used, additional security steps occur.
The browser and server:
- Exchange encryption information
- Verify certificates
- Create a secure communication channel
This protects data during transmission.
Step 5: The Browser Sends an HTTP Request
After connecting, the browser requests the webpage.
Example:
GET / HTTP/1.1 Host: example.com
This request tells the server:
"Please send me the homepage."
The request may also include headers containing additional information.
Step 6: The Server Processes the Request
The web server receives the request.
Examples of web servers include:
- Apache
- Nginx
- Microsoft IIS
The server determines what should happen.
It may:
- Return a static HTML file
- Execute backend code
- Query a database
- Call external APIs
Dynamic websites perform many operations before generating a response.
Step 7: The Server Sends an HTTP Response
The server replies with an HTTP response.
Example:
HTTP/1.1 200 OK Content-Type: text/html
The response contains:
- Status code
- Headers
- HTML content
A successful request usually returns:
200 OK
Step 8: The Browser Receives HTML
The browser starts reading the HTML document.
Example:
<!DOCTYPE html> <html> <head> <title>My Website</title> </head> <body> <h1>Hello World</h1> </body> </html>
The browser doesn't wait for the entire file before processing.
It begins building the page immediately.
Step 9: Building the DOM Tree
As HTML is parsed, the browser creates the Document Object Model (DOM).
Consider this HTML:
<body> <h1>Hello</h1> <p>Welcome</p> </body>
The browser converts it into a tree-like structure.
The DOM allows JavaScript to access and modify page elements.
Step 10: Loading CSS Files
While parsing HTML, the browser discovers CSS files.
Example:
<link rel="stylesheet" href="style.css">
It sends additional HTTP requests to fetch them.
CSS controls:
- Colors
- Layout
- Fonts
- Spacing
- Responsive design
The browser builds a CSS Object Model (CSSOM).
Step 11: Downloading JavaScript Files
The browser also encounters JavaScript.
Example:
<script src="app.js"></script>
It downloads these files.
JavaScript adds functionality such as:
- Buttons
- Forms
- Animations
- API requests
- Interactive menus
Step 12: Building the Render Tree
The browser combines:
- DOM
- CSSOM
to create the Render Tree.
This tree contains only visible elements that should appear on the screen.
Hidden elements are often excluded.
Step 13: Layout Calculation
The browser determines:
- Width
- Height
- Position
- Margins
- Padding
for every visible element.
This process is called layout or reflow.
Step 14: Painting Pixels
The browser paints elements onto the screen.
It draws:
- Text
- Backgrounds
- Borders
- Images
- Shadows
This creates the visual webpage.
Step 15: Compositing
Modern browsers separate content into layers.
These layers are combined efficiently.
This improves:
- Scrolling
- Animations
- Rendering speed
What About Images?
Images aren't included directly inside HTML.
Example:
<img src="photo.jpg">
The browser makes another HTTP request:
GET /photo.jpg
This process repeats for every image.
What About Fonts?
Custom fonts require additional requests.
Example:
@font-face { ... }
The browser downloads them before displaying text correctly.
How JavaScript Makes More Requests
Many websites don't load everything immediately.
JavaScript often requests additional data.
Example:
A shopping website may load:
- Product list
- Reviews
- Recommendations
using APIs after the page appears.
Single Page Applications
Modern frameworks often use Single Page Applications (SPAs).
Examples:
- React
- Vue
- Angular
Instead of reloading entire pages, JavaScript updates only the necessary content.
This creates smoother user experiences.
Why Caching Matters
Without caching, browsers would download every resource repeatedly.
Caching allows:
- Faster loading
- Lower bandwidth usage
- Better performance
Browsers cache:
- Images
- CSS
- JavaScript
- Fonts
when appropriate.
Why HTTPS Is Important
HTTPS encrypts communication between browser and server.
It protects:
- Passwords
- Payment information
- Personal data
Modern websites should always use HTTPS.
Common Errors During Website Loading
Sometimes things go wrong.
404 Not Found
The requested page doesn't exist.
500 Internal Server Error
A server problem occurred.
Slow DNS Lookup
Finding the server takes too long.
JavaScript Errors
Interactive features may stop working.
Network Failures
Resources cannot be downloaded.
How Browser Developer Tools Help
Modern browsers include Developer Tools.
The Network tab lets developers inspect:
- HTTP requests
- Response times
- Images
- JavaScript files
- API calls
This makes debugging much easier.
Why Website Speed Matters
A slow website can cause:
- Higher bounce rates
- Poor user experience
- Lower conversions
- Reduced search engine rankings
Performance optimization improves both users' experiences and SEO.
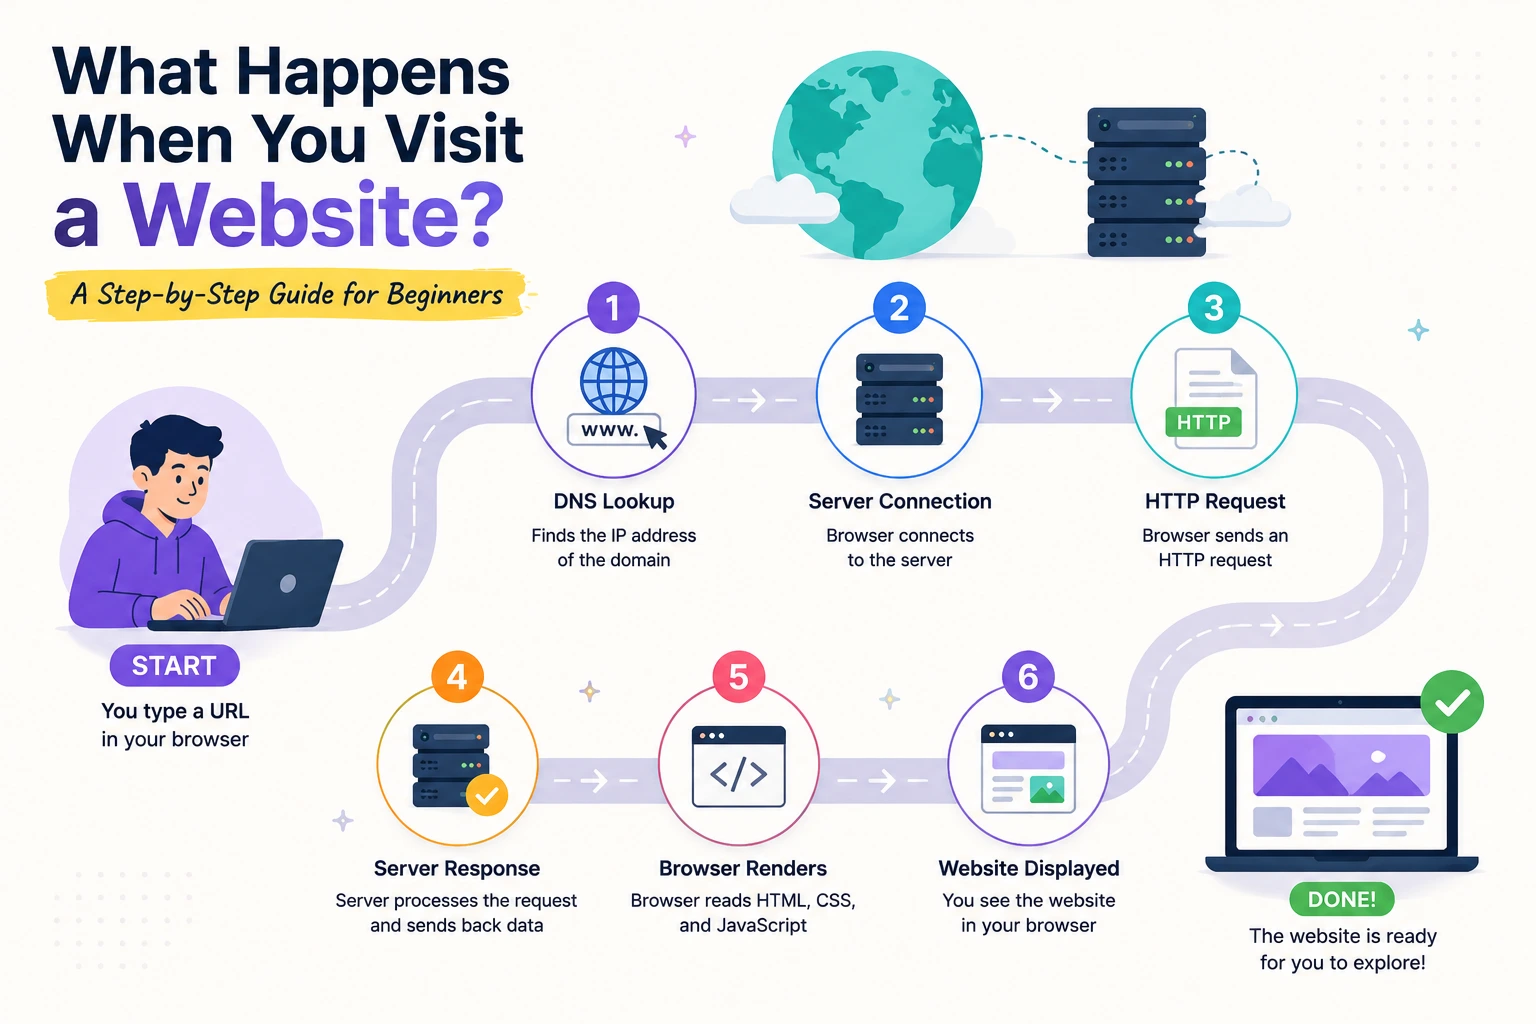
The Complete Process at a Glance
Here's a simplified summary:
- User enters URL.
- Browser checks cache.
- DNS finds the server.
- Connection is established.
- Browser sends HTTP request.
- Server processes request.
- Server sends HTTP response.
- Browser parses HTML.
- DOM is created.
- CSS is downloaded.
- JavaScript is downloaded.
- Render tree is built.
- Layout calculations occur.
- Browser paints the page.
- JavaScript loads additional data if needed.
All of this often happens in just a fraction of a second.
Why Every Developer Should Understand This
Understanding what happens when you visit a website helps developers:
- Debug problems faster
- Improve performance
- Build efficient applications
- Understand frontend and backend interactions
- Optimize user experience
Many advanced web development concepts become much easier once you understand this process.
Final Thoughts
Opening a website may seem simple, but it's actually the result of a sophisticated chain of events involving networking, security, servers, browsers, and rendering engines.
From the moment you type a URL to the instant the webpage appears, your browser performs dozens of tasks behind the scenes. It resolves domain names, establishes secure connections, exchanges HTTP messages, downloads resources, builds the DOM, applies styles, executes JavaScript, and finally paints pixels on your screen.
For beginners, understanding this workflow provides a strong foundation for learning web development. For experienced developers, it offers valuable insights into performance optimization and debugging.
The next time you open a website, you'll know that an incredible amount of technology is working together to make that experience feel effortless.
Try Next
Other utilities you might find helpful
Regex Tester
Test and debug regular expressions with live matches.
Regex Debugger
Understand regex step-by-step with explanations.
JSON Formatter
Format, validate, and minify JSON instantly.
Base64 Encoder/Decoder
Encode and decode Base64 strings and files.
SQL Explain Parser
Analyze SQL execution plans and optimize queries.
DOM Complexity Analyzer
Analyze HTML DOM structure, detect deep nesting, count nodes, and identify performance issues instantly.